The game Levelhead features an extensive level builder, full of powerups, enemies, special blocks, pick-ups, dangers, and many other things to encourage the community to create some interesting and innovative ways to play the game. And while that may be a large draw of the game, jumping straight into the levels comes with the expectation that the player knows what they are doing. Assuming they don’t, the game’s levels help to guide them through all of the different ways to move around and overcome whatever is in their way.
While later levels teach some more advanced techniques, like throwing away boxes just to get a little extra height, or using special enemies and their corpses as bounce pads, the first few levels help to introduce the basics of playing the game. While the level design is fun and challenging-especially to those wanting to beat all of the game’s numerous goals, such as beating a timer, collecting all gems, or finding hidden pieces of bugs-the tutorial levels from “Deliver the Package, GR-18!” (level 1) to “Mad Vacrat Nest” (level 6) is what I will focus on, and how it guides the player to learn its core systems.
While the first level showcases all of the basic controls, such as jumping, picking up or throwing objects, and avoiding obstacles, the subsequent levels introduce how those simple mechanics can be used in new ways, to increase each level’s complexity from that point on. Examples of this could be in level 2, where the player must jump onto enemies in order to safely cross over a spiky floor, or in level level 4 where the player is shown that they can pick up items as they jump, allowing them to reach heights otherwise unavailable to them by jumping onto the block they are carrying, while still taking the block with them for later.
Each level does a good job of allowing the player to test out the newly introduced dynamics by increasing the difficulty over the course of the level. In level 2, the player starts out with a single enemy over a small pit of spikes. They could easily jump over the gap if they wanted, or could try to practice aiming their jump onto the enemy to reach the other side. This is followed a few other small spike pits with enemies to jump over, as well as some gems above an enemy that can only be obtained via jumping on top of the enemy. If the player is getting the hang of the dynamic, the gems will be easily reached, and if not, they can restart just before that moment and try again.
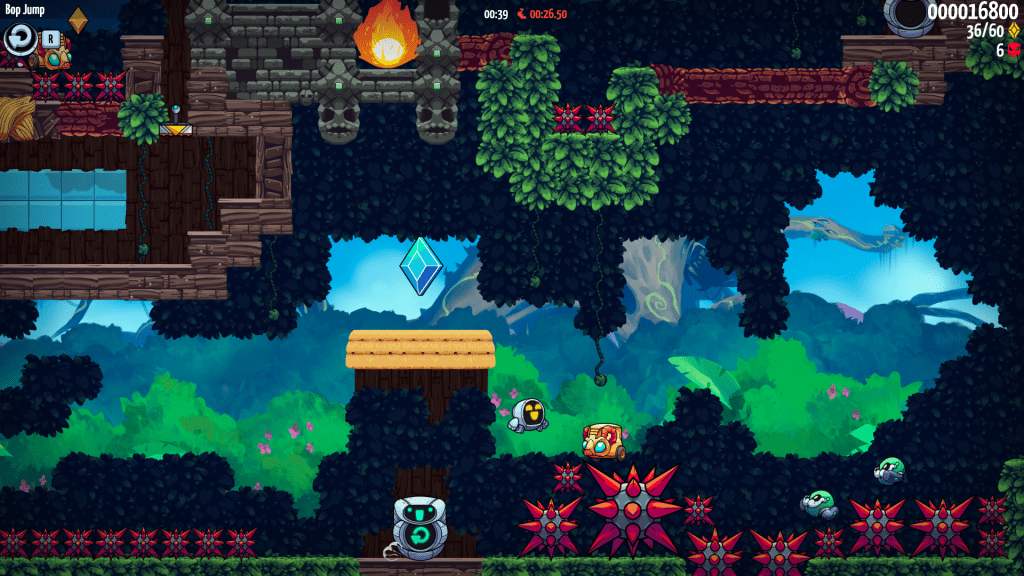
The difficulty is increased just after this though, as while beforehand the player could continue without jumping onto any enemies due to the jumps being small enough, the following two jumps become progressively more difficult. The first one requires the player to jump onto the enemy to cross, as their jump is just a bit too short to cross. The second, however, requires the player to jump onto a minimum of 2 enemies in order to cross, as seen in the image above.
The difficulty curve is manageable for the player, as they are given opportunities to test out what is being shown to them and get used to it, before in later levels they are expected to understand what they should do. As an example of this, in level 4, the player is shown how to pick up the box they are jumping on as they jump. This dynamic is further explored in the following level, as well as used commonly in level 6, which serves as the culmination of all that the player has learned up until this point, using enemies as platforms, grabbing as you jump, using springs to jump much higher, and the disappearing cloud blocks.
As the player will most likely not know what they are doing to start with, the game shows the player through a number of ways what to do, how to do it, and where they should be going. The most obvious of these affordances is telling the player through screens placed around the level what various buttons will do, as well as the many arrows that pop up in order to either lead the player in a certain direction, or to shift their attention to something they haven’t seen yet, such as a switch to open a door. While these are very perceptible, level 4 also makes use of false affordances by showing players that some walls can be false, and can be walked through.

If these affordances weren’t enough to guide the player, a number of signifiers also help them learn things such as timing and where to place items through the use of gems and the background environment. In the first level, the player is shown that they can run and take a long jump, and while the action is shown to them through the arrows and screen, the gems along the jump path and the ropes within the jumping area help to show when the player should be making their action. These gems also serve to nudge the player forwards, towards where they need to go to find the end of the level.
Other effects, such as an enemy briefly flashing white, help the player know when that enemy has been damaged. Likewise, a sound can be heard whenever the player has picked up a gem, letting them know they were successful as a quick animation plays. Where all of this comes to is level 6, which uses each of these tactics at once to get the player to make use of what they have learned. By this point, they have been primed to a few things, such as cloud blocks giving a brief shake before they disappear, but the level also offers a new primer for players in the form of a health pack just before a boss fight against a large Vacrat.
Levelhead makes good use of its level design to show the players the basics of what they can do to be expanded upon later, and setting up the more complicated maneuvers that are introduced in later levels.
